Setting up an email campaign is one of the best marketing activities a store can do. Especially when you start looking into customer retention and long-term loyalty, email marketing can do wonders.
One of my favorite email marketing services is Drip but in order to install Drip into your Shopify store, you'll have to jump through a few hoops.
Unlike other services, Drip works by including a snippet of JavaScript on every page of your store. This snippet allows Drip to track your visitors, subscribers, and also show that cool opt-in pop-up form.
So, here's how you can install Drip into your Shopify store.
1. Get your snippet
First off you need to get your JavaScript snippet from Drip. It will looks a little something like this:
2. Find your store's layout
Now you'll want to login to your Shopify store and find your theme's layout file. This defines the template used for your entire store (e.g. headers, footer).
Think of it as a mould that Shopify uses to add each page to.
- Login to your Shopify admin panel,
- visit your Online Store channel,
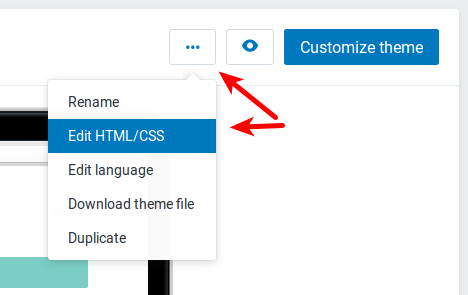
- on the Themes page you'll see a Customize theme button but you want to click the little '...' next to it and pick Edit HTML/CSS,
- find the file called
theme.liquidinside of your Layout directory, - and open the file in Shopify's editor
3. Find the body tag
Now you're going to add the snippet to the theme.liquid file.
This is the one area that you need to be careful with. If you make a mistake or add it incorrectly you could incorrectly install Drip and might even break your store.
(I have a solution to work around this if you're worried about this step. It's near the bottom of this article)
What you want to do is to find the last body tag. It will look like this
The important thing is to find the closing tag which is </body>. There is a second one near the top that is the opening tag but you want to ignore it.
4. Install the Drip snippet
Finally, you want to copy and paste your Drip snippet so it's right before the closing </body> tag. If there are things there already, use the Enter key to make some space.
5. Save and look at your store
Now save the file in the Shopify editor and look at your store.
First off, it should look like normal and not look broken. If it's broken, go back and undo step 4 and try again.
Second, look to see if you have the Drip widget showing up. Normally it's on the bottom right but you might have changed it.
If you haven't finished setting up a campaign in Drip your widget might not appear yet. If that's the case, try publishing the Drip campaign and form quickly to see if it appears. Drip might have a slight delay after publishing before the widget will appear.
Easy way to install Drip into Shopify
Now, if you want the easy way to install Drip into Shopify, you can use Dripify. After a few clicks to install and configure this app, it will automatically install your Drip snippet into your Shopify store. In most cases, you'll be done in under 5 minutes.